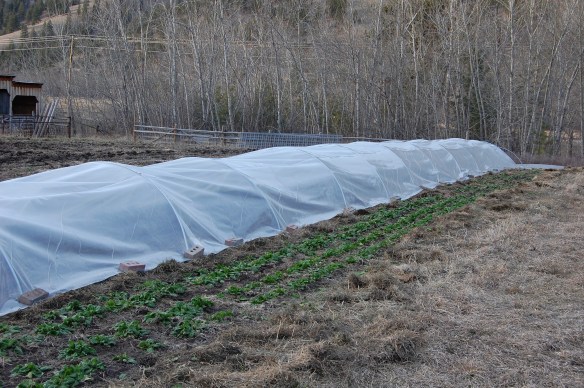
This season Margaret and I are going to try and increase our production a little. We’re interested in growing more on the small amount of space we cultivate. While many farms in our region are taking advantage of the NRCS cost-share high tunnel program, we’re taking a different approach. I want to extend our season a little, but I don’t want to tie up a portion of our land in permanent plastic. So I’m building low tunnels instead. A 6’x100′ tunnel will span two beds and can be put up and taken down in a couple hours. Moreover, to cover the same ground as a high tunnel, low tunnels would cost about a 15th of the price.
These low tunnels are built with standard 1/2″ or 3/4″ EMT electrical conduit, available at most hardware stores for as low as 1.90 per 10′ piece. This stuff is soft enough to work without heavy equipment, but strong enough for a small tunnel. The key is bending the conduit. Johnny’s Selected Seeds sells two different “Quick Hoops” pipe benders: one for a 6′ wide by 3′ tall tunnel, the other for a smaller arc, 4′ wide by 4′ tall tunnels. While they work well, they’re costly. $59 before shipping. So after calling around to some buddies to borrow one, I realized I could build one. Thanks to this awesome post by the folks at IttyBittyImpact, I built a perfectly functional bender in about 10 minutes from wood scraps on the farm.
The basics are simple. Cut out a portion of your circle then sandwich that piece between two boards. Lastly, screw in a brace on one end of the bender to hold your conduit in place while bending.
Detailed steps to building a Low Tunnel EMT conduit Bender:
1. Determine the radius of the tunnel you’re building. For the 6′ wide by 3′ high, the radius is 3′. For the taller and narrower tunnels, the radius is 2′.
2. Build a giant compass. Either cut a piece of scrap wood or piece of string to the length of your radius.
3. Attach one end of your compass to something stationary (or have someone stand on it). With the other end, trace a portion of your circle on piece of 3/4″ plywood.
4. Cut out your circle. This is what the conduit is going to be bent around.
5. Sandwich this bit of circle between two boards (at least 2′ long and 1′ wide), ensuring that the boards exceed the rounded edge of the plywood so that when you’re bending the conduit you have an easy track to follow. Screw it all in place.
6. Place a block of that 3/4″ plywood between those boards on one end of your new bender. Leave enough room to fit an end of conduit between the brace and the rounded edge of the plywood. Screw this securely in place. This brace holds the conduit in place while you’re bending it around the circle.

Raduis measure – I just held one of end of the radius measure in place while I traced the circle onto a piece of plywood. Then cut it.


 Here’s that hole between the block and the plywood arc that holds the EMT in place while it’s being bent. You can see that I used two pieces of 1/2″ plywood to make my arc instead of one 3/4″ piece.
You’re done! Clamp this baby in place and put one end of your pipe in your bender and bend away. Place one end of the 10′ conduit into the bender. For a 6′ hoop, you’ll need to bend the entire piece so start with the end of it even with your brace. Bend it around and then feed about a foot through the brace end of the bender and bend again. Repeat until you’re half way through and then pull the conduit out of the bender and switch sides. This helps keep the circle even on each side. (For 4′ hoops, you’ll feed about 4′ of the conduit through the bender before bending and you’ll only need to bend it once or twice).


 You can see that the hoops aren’t perfect, but they’re close enough.

Next get yourself some plastic (Johnny’s has 10’x100′ pieces for about $80, or cut Nolt’s 24’x100′ for $90 in half) and set ‘er up. If you experience high winds, you’ll want to dig in one long edge of the tunnel.
I’ll till the soil, seed it, and set drip before putting up our tunnel. I’m experimenting with some micro sprinklers for early greens, but the rest will be watered via drip tape or tubing. The plan is to grow our early crops under tunnels and then take them down, till, and re-seed (salad, arugula, or other fast greens) for a second harvest. With the warm February and March we’re having, we should be able to get a jump on the season and make better use of our land in early spring.

